Table of Contents
Introduction
Ever wondered how gold rings are found under waves?
Underwater metal detecting is the fastest way to find lost jewelry on busy U.S. beaches. Many beginners switch from land to water because items are lost daily. If you want to start metal detecting in the United States, water hunting should be your next step.
Getting started in underwater metal detecting differs from getting started in land detecting. Use the right gear, follow local rules, and understand how water affects signals. Lacking this knowledge wastes time and can mean missing valuable finds.
This guide will show you the best way to start metal detecting in water, step by step. You’ll learn what equipment you actually need, where to search, and how to stay safe. By the end, you’ll feel confident stepping into the water and finding your first real treasure.
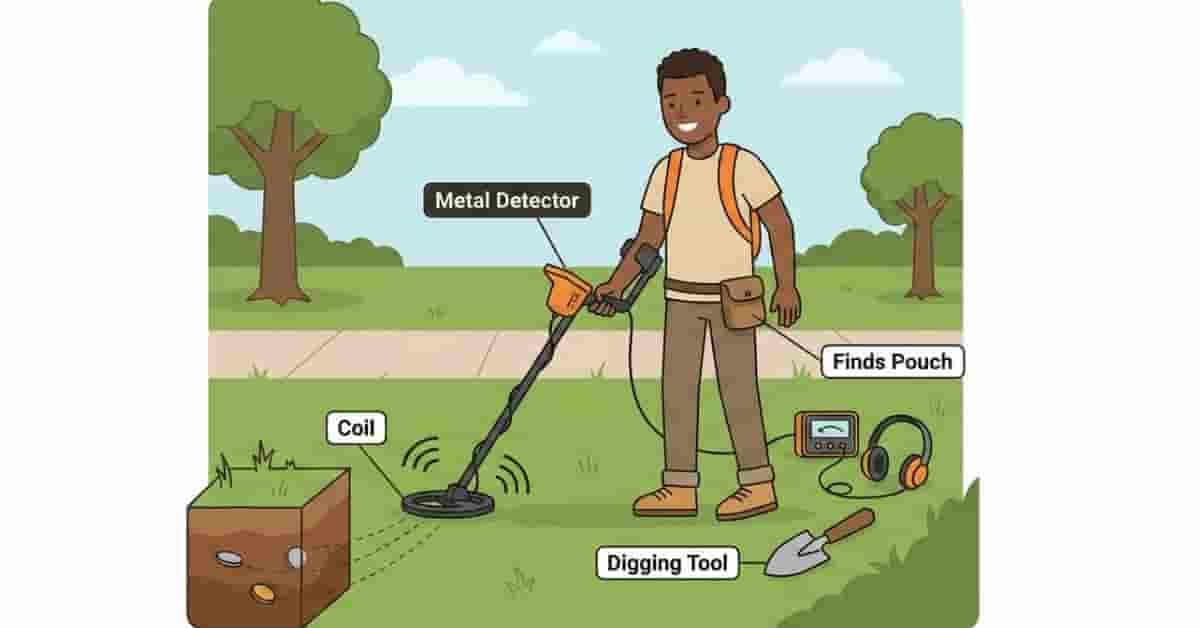
What Is Underwater Metal Detecting?
Underwater metal detecting involves searching for metal objects underwater rather than on dry land. This usually includes beaches, shallow ocean areas, lakes, and swimming zones. Many beginners try it after learning the basics on land because water spots often hold more recent and valuable finds.
The main difference between land and underwater detecting is how signals behave. Water, especially saltwater, can affect your detector’s accuracy and depth. You also deal with waves, currents, and limited visibility, which slow recovery and make it more physically demanding.
Another key difference is how targets are found. On land, items stay where they fall. In water, waves and tides move objects around. This movement often pushes heavier items, such as rings and coins, into specific zones, creating “hot spots” where finds accumulate over time.
Many beginners move to beach detecting because results can come faster. Busy beaches mean more lost jewelry, especially in swimming areas where people are more likely to drop or lose items.
Takeaways
- Underwater detecting focuses on beaches, lakes, and shallow water areas.
- Signals behave differently due to water and mineral content.
- Waves and tides move targets into high-probability zones.
- Beaches offer higher chances of finding jewelry.
Pro Tips
- Start in shallow water before going deeper.
- Focus on high-traffic swimming areas.
- Learn how water conditions affect your detector signals.
Is Underwater Metal Detecting Legal in the United States?
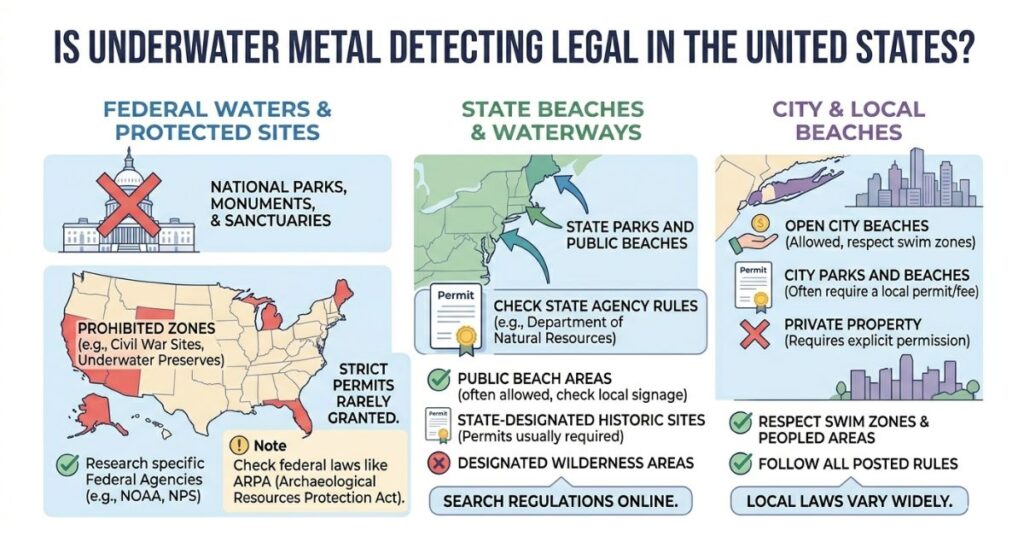
Underwater metal detecting is legal in many parts of the United States, but rules change by location. Before you start, always check local laws to avoid fines or gear confiscation. Beaches and water areas fall under different authorities, so one rule does not apply everywhere.
When it comes to federal waters, the rules differ again. Detecting is usually restricted, especially near protected zones or historic sites. Laws like the Archaeological Resources Protection Act protect old artifacts. If you find something historic, you may not be allowed to keep it. When in doubt, treat unknown items carefully and report them.
State and city beaches often allow more flexibility, though rules and permit requirements vary by location, so always confirm restrictions before visiting.
Permits are sometimes required, especially in managed or popular beach areas. These are usually easy to get and low-cost. It’s always safer to check official state or city websites before you go.
As another important rule of thumb, avoid detecting in National Parks, protected areas, or historical sites. These places are strictly off-limits, and penalties can be serious.
Takeaways
- Laws vary at the federal, state, and city levels.
- State and city beaches are usually beginner-friendly
- Permits may be required in some areas.
- Protected and historical sites are off-limits.
Pro Tips
- Check local beach rules before every trip.
- Carry a simple permit copy if required.
- Stay away from marked protected zones.
What Equipment Do You Need for Underwater Metal Detecting?
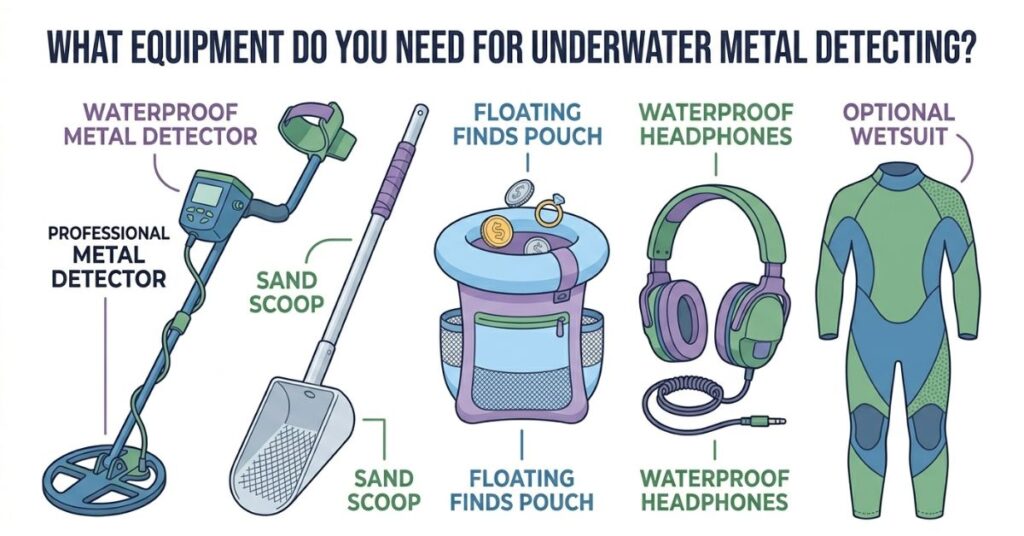
Underwater metal detecting requires gear built for moisture, pressure, and mineral interference. The right tools save time and protect your detector from damage.
In water detecting, durability and recovery gear are crucial. Equipment must function smoothly in wet sand, waves, and deeper water. Using a non-waterproof detector can damage your setup.
Now that you understand why specialized equipment is crucial, let’s look at the essential water-specific tools every beginner should know.
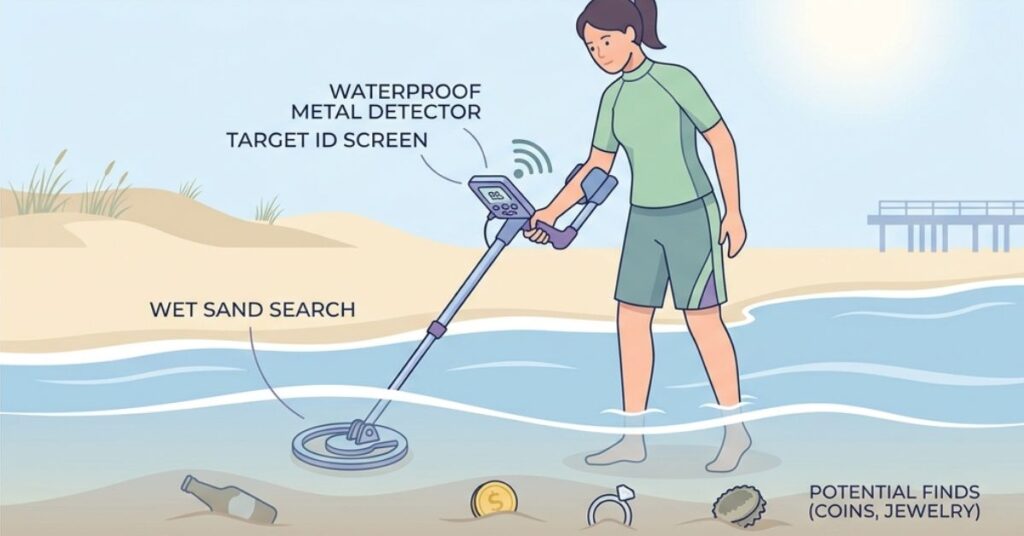
Waterproof Metal Detectors (IP Ratings Explained)
A waterproof metal detector is essential for water hunting. Not all detectors are equal, so IP (Ingress Protection) ratings matter. IP ratings show how well a device resists water and dust.
Fully submersible detectors are designed to work underwater at specific depths. These are ideal for beach and shallow-water diving. On the other hand, water-resistant detectors can handle splashes or wet sand, but they should not be fully submerged.
Depth ratings indicate how deep your detector can go. Some models work up to 3 meters; others handle depths of up to 10 meters. Match your detector to your hunting needs to prevent damage.
Pro Tips
- Choose a fully submersible detector for beach water hunting.
- Check depth ratings before entering deeper water.
- Avoid using water-resistant detectors in waves or submersion.
Water Hunting Accessories
A few key accessories make underwater metal detecting easier and faster. These tools help you recover targets and stay comfortable.
A sand scoop digs targets in wet sand or shallow water, draining water while retaining objects. A floating pouch stores recovered items so they aren’t lost. Waterproof headphones are crucial, letting you hear signals even in the presence of wave noise. wave noise. In colder areas, a wetsuit is optional but keeps you warm and in the water longer.
Takeaways
- Water detecting requires fully waterproof gear.
- IP ratings and depth limits are critical.
- Recovery tools improve speed and success.
- Accessories make hunting safer and more efficient.
Freshwater vs Saltwater Metal Detecting
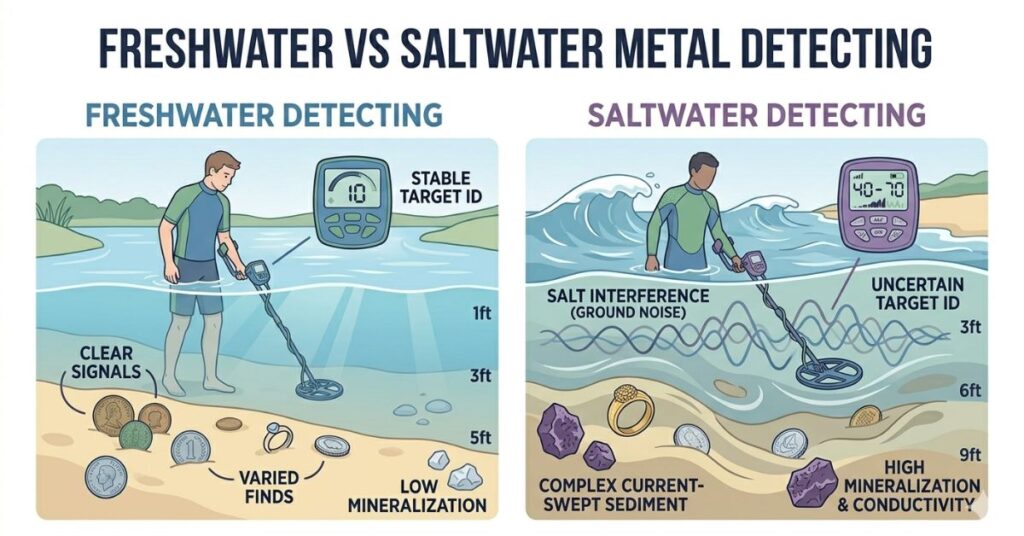
Water hunting varies with freshwater and saltwater. Recognize how each affects your detector to excel at underwater metal detecting.
Freshwater areas like lakes and rivers are easier for beginners. They have low mineral content, so detectors stay stable and give cleaner signals. As a result, you will receive fewer false signals, making learning faster and less frustrating.
Saltwater is more challenging due to its high mineralization. Salt creates interference that can confuse standard detectors. This often leads to false signals or reduced depth. That’s why saltwater requires special detectors with salt mode or multi-frequency technology. These features help balance the mineral effect and improve accuracy.
Additionally, there is a big difference between lakes and oceans. Lakes usually have calm water, steady conditions, and predictable targets near entry points. On the other hand, oceans are more dynamic, with waves and tides constantly moving objects. This movement creates target-rich zones but also makes detecting harder.
Takeaways
- Freshwater is beginner-friendly with stable signals.
- Saltwater causes interference due to mineralization.
- Special detectors are needed for ocean hunting.
- Lakes are calm; oceans are dynamic and shift targets.
Pro Tips
- Start in freshwater to build confidence.
- Use salt mode when detecting on ocean beaches.
- Focus on wave action areas where targets collect.
Best Places to Start Underwater Metal Detecting in the USA
Choosing the right location can make or break your success in underwater metal detecting. In the United States, some spots naturally collect more lost items than others. The goal is simple: go where people gather and where they often enter the water.
Public beaches are one of the best starting points. These areas stay busy, especially during summer, increasing the risk of losing coins and jewelry. Look for sections with easy water access, as these are the most active.
Swimming areas are even better. People often remove rings, chains, or watches before entering the water, or lose them while swimming. Focus on shallow zones where people stand, dive, or play. These areas produce consistent finds for beginners.
Lake entry points are another smart option. Calm water and clear entry paths make detecting easier. Targets often collect where people repeatedly walk into the water. These spots are perfect for practice and steady results.
Tourist-heavy beaches offer high potential but more competition. Still, heavy foot traffic means more recent drops. Early mornings or off-peak times can give you an edge.
Takeaways
- High-traffic areas increase your chances of finding.
- Swimming zones are top spots for lost jewelry.
- Lake entry points are beginner-friendly and calm.
- Tourist beaches offer high rewards with more competition.
Safety Tips for Water Detection
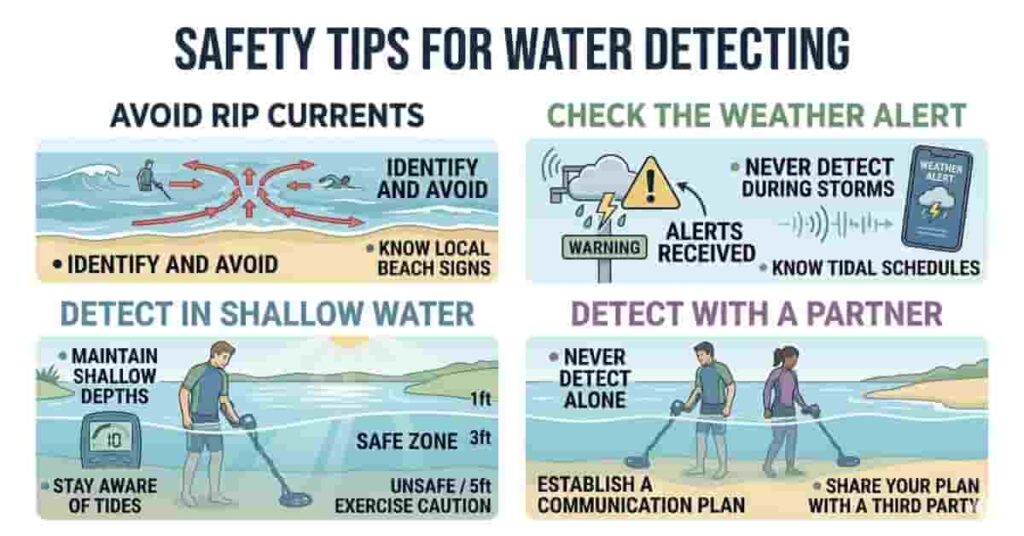
Water detection can be exciting, but safety should always come first. Conditions can change quickly, especially in ocean environments. A small mistake in water can turn risky fast, so it’s important to stay alert and prepared.
Rip currents are dangerous. They can pull you away from shore fast. Always check beach warnings before entering. If pulled, stay calm and swim sideways.
Weather awareness is just as important. Sudden storms, strong winds, or lightning can make water detection unsafe. Always check the forecast before heading out and leave the water if conditions change.
Stay aware of water depth. Beginners should use shallow areas with stable footing. Avoid uneven ground and sudden drop-offs.
Never detect alone in water. Go with a partner who can help if needed. Even experts use this rule.
Best Way to Start Underwater Metal Detecting as a Beginner

Start your underwater metal detecting journey right to avoid frustration and gear damage. For US beginners, a simple step-by-step approach helps you learn quickly and get better results.
Begin in shallow water. This allows you to get used to how your detector behaves in wet conditions without risking deep-water currents. Shallow zones also make it easier to recover items and monitor waves and tides.
Practice in calm water before you move on to beaches with waves. Lakes or protected swimming areas provide a perfect learning environment. In calm water, you can focus on signals, practice digging techniques, and observe how your equipment handles wet sand or mud.
Always test signals before you dig. Water may distort or mask signals, so gently sweep the area and pinpoint the target. When you confirm the signal, you avoid unnecessary digging and protect your tools.
Learn tide timing, especially at ocean beaches. Low tide exposes more sand, making finds easier to access. High tide can move objects aroundHigh tide can shift objects, making detection more difficult.ditions increases success.
Pro Tips
- Begin at low tide for maximum exposure of the sand.
- Use short sweeps and mark promising spots.
- Practice in a small, predictable area before expanding
Common Mistakes Beginners Make in Water Detecting
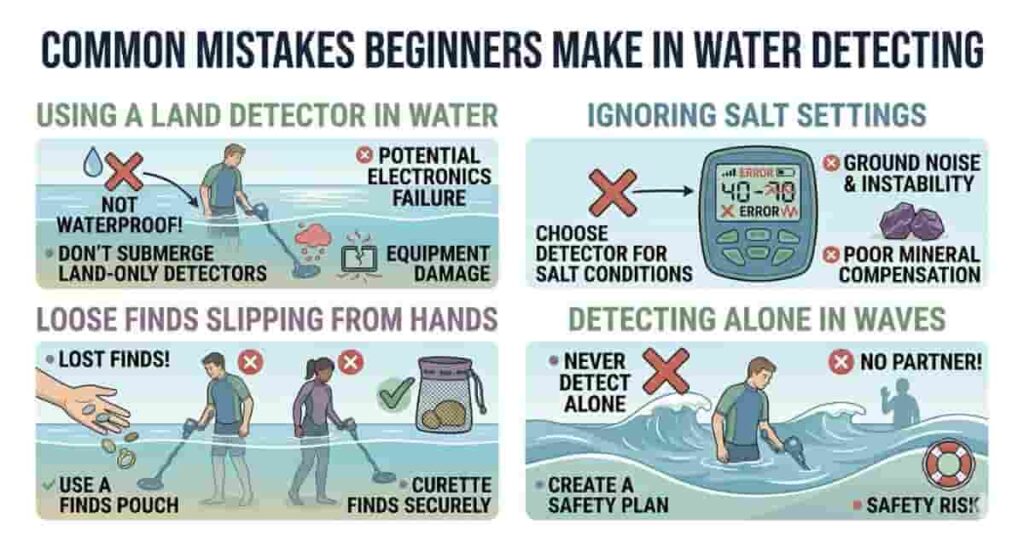
Beginners often make mistakes that reduce success or damage gear. Learn these pitfalls to avoid frustration and ensure safer, more productive water detection.
Using a land detector in water is a common mistake. These devices cannot handle wet conditions and will short-circuit if submerged. Always use a waterproof detector rated for your hunting depth.
Ignoring salt settings is another frequent mistake. Saltwater can cause false signals and confuse standard detectors. Many beginners overlook the need to adjust to salt mode, leading to missed finds or wasted time digging useless targets.
Failing to secure finds is a problem. Jewelry, coins, and small objects easily slip away in waves or currents. Use a floating pouch or container to keep items safe until you leave the water.
Detecting unsafe conditions is risky. Strong currents, bad weather, or detecting alone can quickly turn dangerous. Beginners sometimes underestimate water hazards, which can lead to accidents or equipment loss.
Can Beginners Find Gold Jewelry in Water?
Yes, beginners can find gold jewelry in water, especially at busy beaches or popular swimming spots where people often lose valuables.
Waves and tides can pull items from hands or pockets, and sand quickly buries them. Even small missteps, like removing rings before entering the water, lead people to drop items without noticing. Target places where swimmers usually enter or exit the water—these areas often become “drop zones.”
Realistic expectations are important. Beginners shouldn’t expect to find a large treasure immediately. Small coins or jewelry are more common, and consistently detecting them over time increases results. Patience, proper gear, and understanding water behavior all improve the odds of success.
Takeaways
- Busy beaches and swimming areas are most productive.
- Jewelry is lost in shallow zones and moved by waves.
- Start with realistic expectations and focus on small finds.
- Consistent practice improves success rates.
Conclusion
In this guide, we covered everything beginners need to know about underwater metal detecting. You learned the differences between land and water detecting, essential gear, legal rules, safe locations, and how to start effectively. We also explored freshwater vs saltwater challenges and how to maximize your chances of finding lost jewelry.
With the right equipment, knowledge, and safety steps, you can enjoy metal detecting in the USA. Patience and practice lead to consistent results. Beginners often find small treasures more quickly and safely using these steps.
Ready to begin your own water detecting adventure? Share your discoveries or questions in the comments below, challenge yourself to find your first piece of lost jewelry, and explore more resources to sharpen your detecting skills. Start your journey today and become an active part of the detecting community!
Ethan Callaway is a passionate metal detecting enthusiast based in Savannah, Georgia, USA. Currently pursuing a B.S. in Archaeology & Historical Preservation at the University of Georgia, he combines his love for treasure hunting with research-backed insights on metal detecting techniques, safety practices, and site guidance.
Through MetalDetectingUSA.com, Ethan shares practical tips, honest product reviews, and beginner-friendly advice to help both new and experienced detectorists explore metal detecting across the United States with more confidence and understanding.