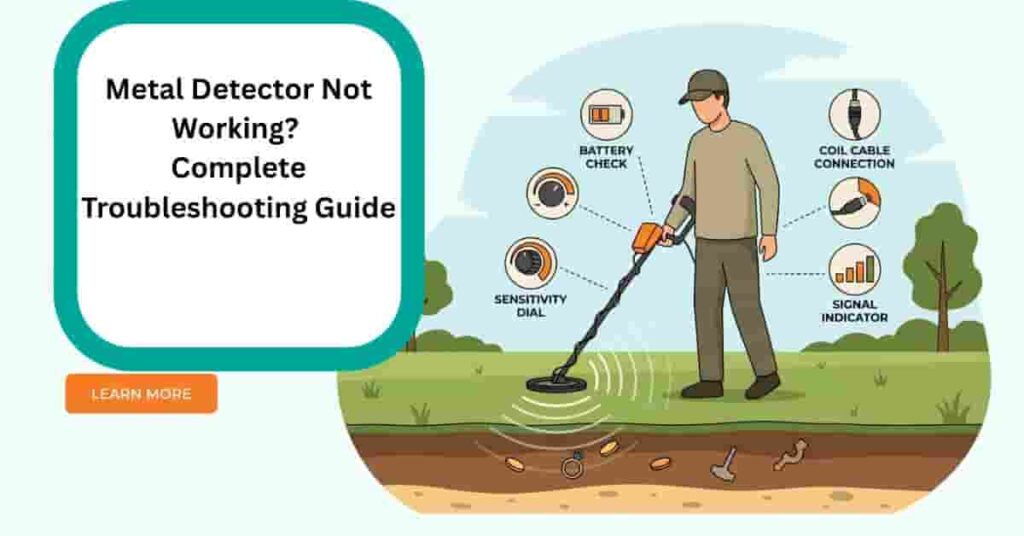
Introduction
Is your metal detector not detecting targets anymore? It turns on, but the signals seem to be gone.
This problem frustrates many beginners across the United States. You head to the beach or park, start sweeping, and hear nothing. Sometimes the detector only gives random beeps. Other times, it stops finding coins or even gold. The good news is that most problems are simple. A wrong setting, weak batteries, or a loose coil cable often causes the issue. Serious hardware failures are actually rare.
Many new hobbyists assume their detector is broken. In reality, a small adjustment usually fixes the problem. Even experienced detectorists face this situation when they change locations or soil conditions. Different environments in the U.S. can also affect performance. Wet beach sand, mineralized soil, or nearby power lines often confuse detectors. These conditions may cause false signals or missed targets.
This guide will walk you through step-by-step metal detector troubleshooting. You will learn why your detector stops detecting and how to fix it quickly. We will also cover common problems like a metal detector not detecting gold, false signals, and beach interference. Plus, you’ll find simple checks for popular detector brands used by hobbyists.
By the end, you’ll know how to diagnose the problem and get your detector working again—so you can get back to finding coins, relics, and maybe even gold.
Quick 60-Second Checklist (Before You Panic)
If your metal detector is not detecting targets, don’t assume it’s broken yet. Many problems come from small settings or quick setup mistakes. Before deep troubleshooting, try this quick 60-second checklist. Simple checks often fix detection issues fast.
Start with the basics. Look at the power, batteries, and the coil connection. Then review your sensitivity and detection mode. These settings control how the detector responds to metal objects. Location also matters more than many beginners realize. Soil minerals, wet beach sand, and nearby electronics can affect signals. Even moving from a park to a saltwater beach can change how your detector behaves.
Take one minute to use this checklist and pinpoint the most common issues fast.
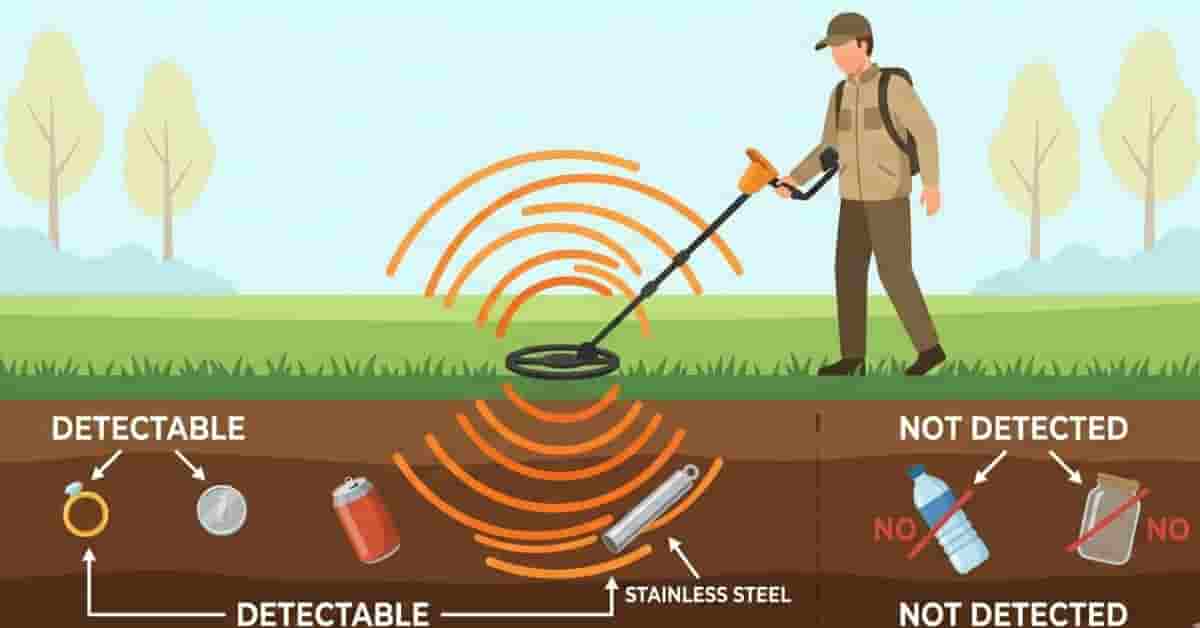
In some cases, the issue isn’t the detector itself but the type of material underground. Some people are surprised to learn there are metals that metal detectors cannot detect.
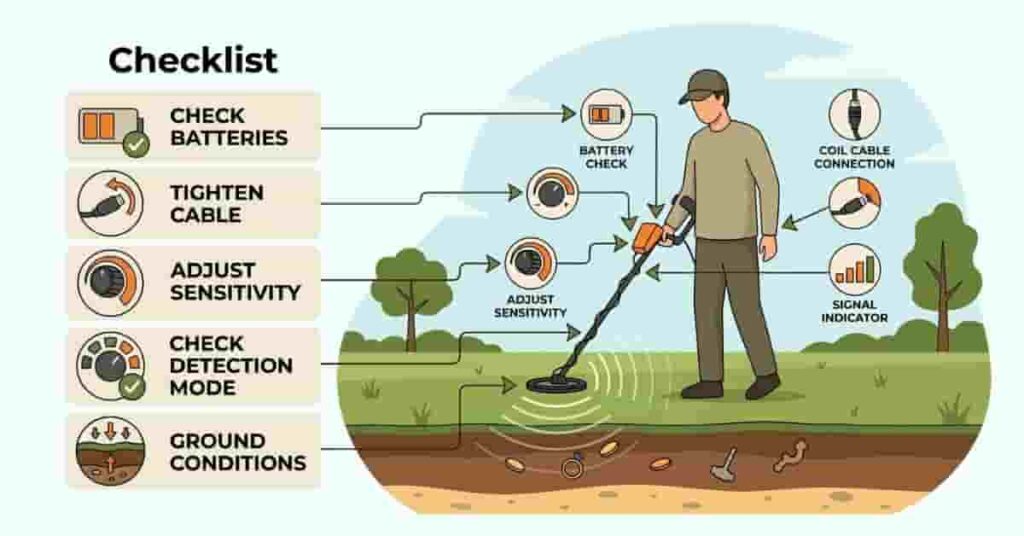
Quick Troubleshooting Checklist
- Is the detector powering on?
Make sure the screen lights up, and the machine starts normally. - Are the batteries fresh?
Weak batteries reduce detection depth and may cause unstable signals. - Is the coil cable tight?
A loose cable can cause false beeps or prevent detection. - Is sensitivity set too low?
Very low sensitivity limits how deep your detector can find targets. - Did you select the wrong detection mode?
Some modes filter out certain metals, like jewelry or small targets. - Did you change locations recently?
Wet sand, mineralized soil, or black sand may require new settings.
Takeaways
- Most detection problems come from settings, power, or coil connections.
- Environmental changes often affect signal stability.
- A quick checklist can save hours of frustration in the field.
If your detector still has issues, review the next section for key reasons detectors stop detecting targets and solutions.
12 Common Reasons Your Metal Detector Is Not Detecting

When a metal detector does not detect targets, the cause is usually simple. Most problems come from settings, power issues, or environmental conditions.
Beginners often assume the detector is broken. In reality, small adjustments often fix the problem. Learning these common causes helps you diagnose issues quickly. Different hunting environments across the United States can also affect performance. Mineralized soil, wet beach sand, and electrical interference may confuse detectors. These factors can reduce depth or cause unstable signals.
Below are the most common reasons detectors stop detecting targets, along with how to fix them.
1. Dead or Weak Batteries
Weak batteries are one of the most common causes of detection problems. A metal detector needs a stable voltage to maintain depth and signal accuracy. When battery power drops, the detector may still turn on. However, it may struggle to detect deeper targets. You may also hear random beeping or unstable signals.
Many beginners overlook this step and start adjusting settings first. Always check the power before doing serious troubleshooting. Fresh batteries often restore normal performance immediately. If you hunt regularly, carry spare batteries in your gear bag.
Pro Tip:
Replace batteries before long detecting sessions. Stable power improves depth and reduces false signals.
2. Loose or Damaged Search Coil Cable
The search coil is the most important part of your metal detector. If the cable connection becomes loose, the detector may behave unpredictably. A loose coil cable can create false signals or prevent proper detection. Movement in the cable may also trigger random beeping.
Physical damage can also cause issues. Cracks in the coil housing or water entering the coil may reduce performance. Check that the coil connector is fully tightened. Also, inspect the cable for wear or bending near the coil.
Pro Tip:
Wrap the coil cable firmly around the shaft. A secure cable reduces signal interference during sweeps.
3. Sensitivity Set Too Low
Sensitivity controls how deeply your detector can find metal objects. If this setting is too low, the detector may miss many targets.
Beginners often have lower sensitivity, which helps avoid noisy signals. While this reduces interference, it also limits detection depth. Low sensitivity makes it harder to detect small coins, jewelry, and relics. You may sweep over targets without hearing any signal. Increase sensitivity gradually until the detector stabilizes again. Finding the right balance improves depth without creating excessive noise.
Pro Tip:
Start with medium sensitivity when learning your detector. Adjust gradually based on ground conditions.
4. Sensitivity Set Too High (False Signals Problem)
Very high sensitivity can create the opposite problem. Instead of missing targets, the detector may produce constant noise. High sensitivity amplifies ground minerals and electrical interference. This often causes random beeps or unstable signals.
Wet sand, mineralized soil, and nearby electronics can worsen this problem. The detector may sound like it is finding targets everywhere. Reducing sensitivity slightly often stabilizes the machine. A stable detector helps you identify real targets more easily.
Pro Tip:
If your detector becomes noisy, lower the sensitivity one level at a time until signals stabilize.
5. Ground Balance Not Properly Set
Ground balance helps the detector ignore minerals in the soil. When this setting is wrong, the detector may lose depth or produce false signals. Many areas in the United States contain mineralized soil. Red clay regions and gold prospecting areas are especially challenging.
Without proper ground balance, the detector may respond to the ground rather than metal targets. Some detectors adjust this automatically, while others require manual adjustment. Always ground balance when you change locations.
Pro Tip:
Re-ground balance when moving from dry soil to wet sand or highly mineralized ground.
6. Wrong Detection Mode Selected
Modern detectors offer multiple detection modes. These modes filter certain metals using discrimination settings. If the wrong mode is active, the detector may ignore valuable targets. For example, coin mode often filters out small gold jewelry.
Jewelry mode may detect gold but ignore certain coins or relics. All-metal mode detects almost everything but creates more noise. Beginners sometimes forget they changed the detection mode earlier. Always confirm the correct mode before starting a hunt.
Pro Tip:
Use all-metal mode when learning your detector. It helps you understand how different targets sound.
7. Heavy Soil Mineralization
Soil mineralization can significantly affect a metal detector’s performance. Minerals in the ground create signals that confuse detectors.
Common examples include black sand, saltwater beaches, and desert hot rocks. These conditions appear frequently across the United States. Highly mineralized ground may reduce depth or create unstable signals. Beginners often mistake this for a faulty detector.
Proper ground balance and moderate sensitivity help manage these conditions.
Pro Tip:
Move a few feet and rescan the area. Mineralization often varies even within the same location.
8. Electromagnetic Interference (EMI)
Electronic signals in the environment can interfere with metal detectors. This problem is called electromagnetic interference, or EMI. Power lines, cell towers, and nearby electronics often create this interference. Other metal detectors operating nearby can also cause noise.
EMI may produce constant chatter or random beeping. The detector may react even when no metal exists. Changing frequency settings or lowering sensitivity usually reduces interference.
Pro Tip:
Walk away from power lines or large electrical equipment if your detector becomes unstable.
9. Sweep Speed Too Fast
Sweep speed plays a major role in detection accuracy. Moving the coil too quickly can cause the detector to miss targets. Many beginners swing the detector faster than recommended. This shortens the time the coil spends over a target. When the signal is too brief, the detector may fail to register it. This problem often causes coins and small objects to be missed.
Slow, steady sweeps allow the detector to process signals correctly.
Pro Tip:
Imagine painting the ground slowly with the coil. Consistent sweeps improve detection accuracy.
10. Target Too Small or Too Deep
Not every metal object produces a strong signal. Some targets fall outside the detector’s effective range.
Tiny gold flakes, microchains, and very thin jewelry often produce weak signals. Deep objects may also fall beyond the detector’s depth limit. Many beginner detectors detect coins at depths of [placeholder] or more, depending on soil conditions.
Understanding these limits helps set realistic expectations during hunts.
Pro Tip:
Use slower sweeps and higher sensitivity when searching for very small targets.
11. Coil Size Not Suitable
Search coil size affects how a detector finds targets. Large coils detect deeper objects but may struggle with small targets. Small coils work better for tiny objects and trash-filled areas. They separate signals more accurately in crowded ground.
If you search for small gold jewelry, a smaller coil may improve results.
Choosing the correct coil depends on your hunting location and target type.
12. Internal Component Failure (Rare)
True hardware failure is rare but possible. Internal electronic issues can prevent the detector from working correctly. Symptoms may include constant unstable signals or a complete loss of detection. The detector may also fail to respond after a reset.
If you have checked batteries, settings, and the coil, internal damage may be the cause.
Water damage, severe impacts, or aging electronics can cause these failures.
Takeaways
- Most problems stem from settings, batteries, or the environment.
- Simple adjustments usually restore normal performance.
- Hardware failure is uncommon compared to setup mistakes.
Understanding these common issues helps you troubleshoot quickly and return to successful metal detecting.
Why Is My Metal Detector Not Detecting Gold?
Beginners often struggle to detect gold with metal detectors, even though they can easily find coins and other metals. Gold is more difficult to detect because it behaves differently from many common targets. Several key factors directly impact gold detection with a metal detector. Gold size, detector frequency, soil minerals, and discrimination settings all play a role. Even experienced detectorists sometimes miss gold because of these conditions.
Understanding how detectors respond to gold can help you adjust settings and improve your chances of finding it.
Gold Conductivity Explained
Metal detectors identify objects based on electrical conductivity. Gold conducts electricity, but not as strongly as metals like silver or copper. As a result, many detectors read gold in the mid-range signal area. This area often overlaps with trash targets such as foil or pull tabs.
Some beginners accidentally ignore these signals because they think they are junk. In reality, many gold rings and small jewelry pieces produce similar responses.
Learning your detector’s target ID range helps you recognize possible gold signals.
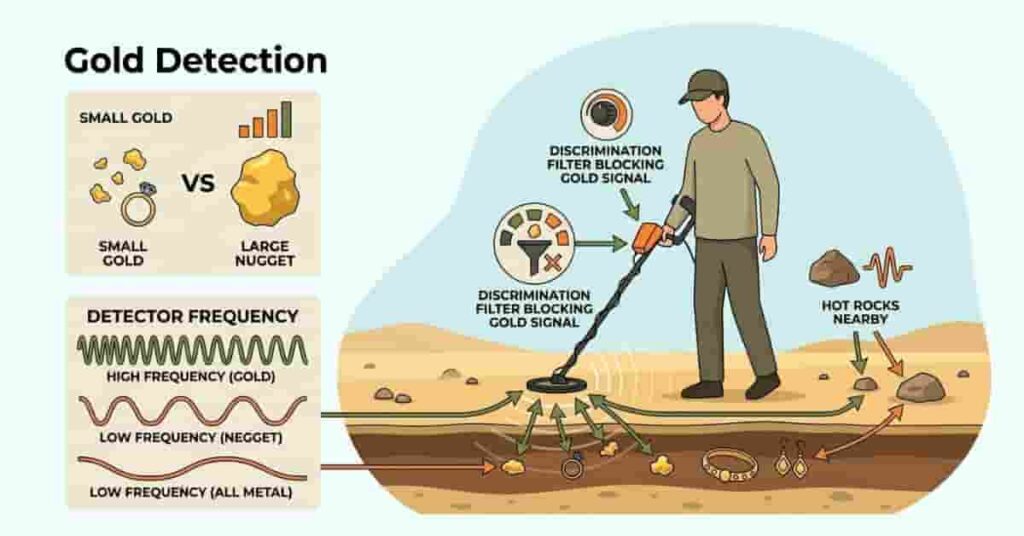
Small Gold vs. Large Gold Nuggets
The gold size greatly affects how a detector responds. Large nuggets produce stronger signals and are easier to detect. Small gold items are much harder to find. Thin chains, tiny flakes, and micro jewelry produce weak signals. Some beginner detectors struggle to detect these targets. Gold prospecting areas in the western United States often contain very small nuggets. Detecting them requires careful sweeps and sensitive equipment.
Using slow sweep speeds and proper sensitivity improves your chances of hearing these faint signals.
Detector Frequency Matters
The detector frequency affects the types of targets your machine detects best. Higher frequencies usually detect smaller objects more easily. Many gold prospecting detectors operate at higher frequencies. These frequencies respond better to tiny nuggets and flakes. Lower-frequency detectors often perform better for larger targets and deeper objects. However, they may struggle with very small gold.
Choosing the right detector or frequency setting can significantly improve gold detection.
Hot Rocks Can Confuse Your Detector
Hot rocks are mineralized stones that emit signals similar to those of metal. They often appear in desert and gold prospecting areas. These rocks can trick your detector into giving false signals. Beginners sometimes think they have found gold, only to discover a hot rock. Ground balance and experience help reduce this problem. Over time, you will learn how hot rocks sound different from real metal targets.
Discrimination May Filter Out Gold
Discrimination settings allow detectors to ignore certain metals. This helps reduce trash signals during hunts. However, strong discrimination can accidentally filter out gold signals. Small gold items often fall into the same range as foil or aluminum. If your detector ignores these signals, it may skip potential gold targets.
Lowering discrimination or using the all-metal mode increases your chances of finding gold.
Takeaways
- Gold produces weaker signals than many other metals.
- Small gold items are much harder to detect than large nuggets.
- Detector frequency and sensitivity strongly affect gold detection.
- High discrimination settings may accidentally ignore gold signals.
Understanding these factors helps explain why a metal detector does not detect gold in certain conditions. Adjusting settings and sweep techniques can greatly improve your success rate.
Why Does My Metal Detector Give False Signals?
Does your detector beep constantly even when no metal is present? False signals are a common problem, especially for beginners.
When a metal detector is not detecting properly, it may also produce unstable signals. Instead of clear target tones, you hear random beeps or chatter. False signals usually stem from settings, ground conditions, or electronic interference. Fortunately, most are easy to fix with a few adjustments. Understanding the main triggers will help you stabilize your detector and identify real targets more confidently.
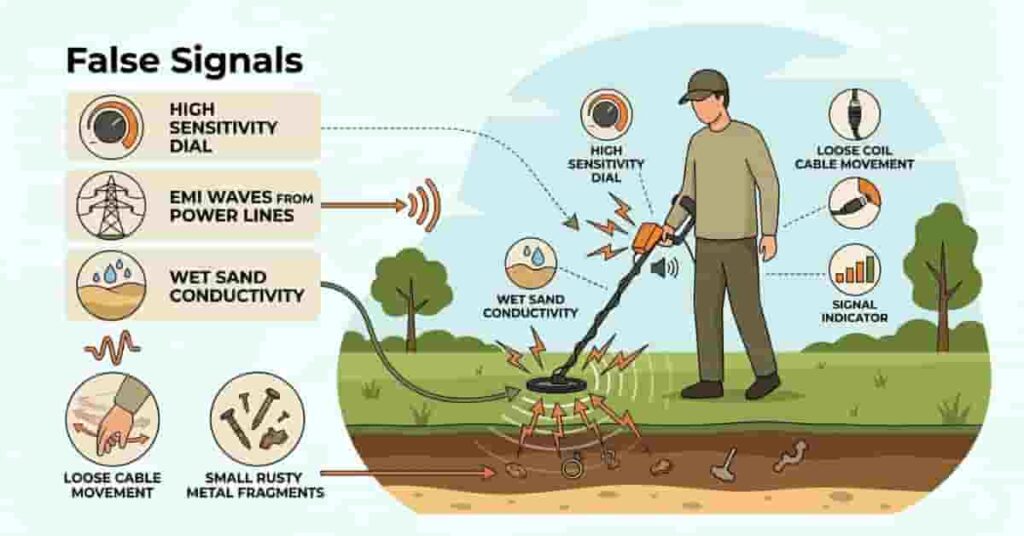
Sensitivity Set Too High
High sensitivity increases detection depth, but it also amplifies noise. Your detector may start reacting to ground minerals and tiny electrical disturbances. This often creates constant beeping or unstable signals. Beginners sometimes increase their sensitivity to the maximum, thinking they will find more targets.
Instead, the detector becomes too sensitive to its environment.
Pro Tip:
Lower the sensitivity one level at a time until the detector runs smoothly.
Wet Sand Conductivity
Saltwater beaches create a unique challenge for metal detectors. Wet sand contains salt minerals that conduct electricity. This conductivity can confuse single-frequency detectors. The machine may respond to the sand itself rather than to metal targets.
Many beginners notice this problem when they move from dry sand to wet sand near the waterline.
Pro Tip:
Reduce sensitivity and re-ground balance when detecting on wet beach sand.
Electromagnetic Interference (EMI)
Electronic signals from the environment can interfere with your detector. Power lines, cell towers, and nearby electronics often cause EMI. Other metal detectors operating nearby may also create interference.
When EMI occurs, the detector may produce constant chatter even when there is no metal in the ground.
Pro Tip:
Move farther from electrical sources, or switch the frequency setting if your detector supports it.
Coil Cable Movement
A loose or poorly wrapped coil cable can create false signals. When the cable moves during sweeps, it may generate electrical noise. This problem often appears when the cable is not secured along the detector shaft.
The detector may beep randomly as the cable shifts position.
Pro Tip:
Wrap the coil cable snugly around the shaft and secure the connector firmly.
Rust Flakes and Tiny Trash
Small pieces of rusty metal, foil, or aluminum trash often produce confusing signals. These objects can mimic the sound of real targets. Rust flakes especially appear in old parks, relic sites, and construction areas. They sometimes produce broken or jumpy signals.
Experienced detectorists learn to recognize these irregular tones.
Pro Tip:
Sweep the coil slowly from multiple angles to confirm if the signal is consistent.
Quick Checklist to Reduce False Signals
If your detector becomes unstable, run through this quick checklist:
- Lower sensitivity slightly
- Re-ground the balance of the detector.
- Check the coil cable connection.
- Move away from power lines or electronics.
- Slow your sweep speed.
- Scan the target from different directions.
Takeaways
- False signals are mostly caused by improper settings, ground conditions, or interference. High sensitivity and wet sand are common causes.
- Cable movement and small trash can also confuse detectors.
Once you stabilize your detector, you will hear cleaner signals and identify real targets much more easily.
Beach Metal Detecting Problems (USA Focused)
Beach hunting is exciting, but it also creates unique challenges. Many beginners notice their metal detectors not detecting correctly when they move from parks to beaches.
Saltwater, wet sand, and heavy minerals can confuse many detectors. Instead of clean signals, the machine may produce noise or unstable readings. These issues are common along many U.S. coastlines, including those of Florida, California, and the East Coast. Understanding how beach conditions affect your detector helps you adjust settings quickly and improve performance.
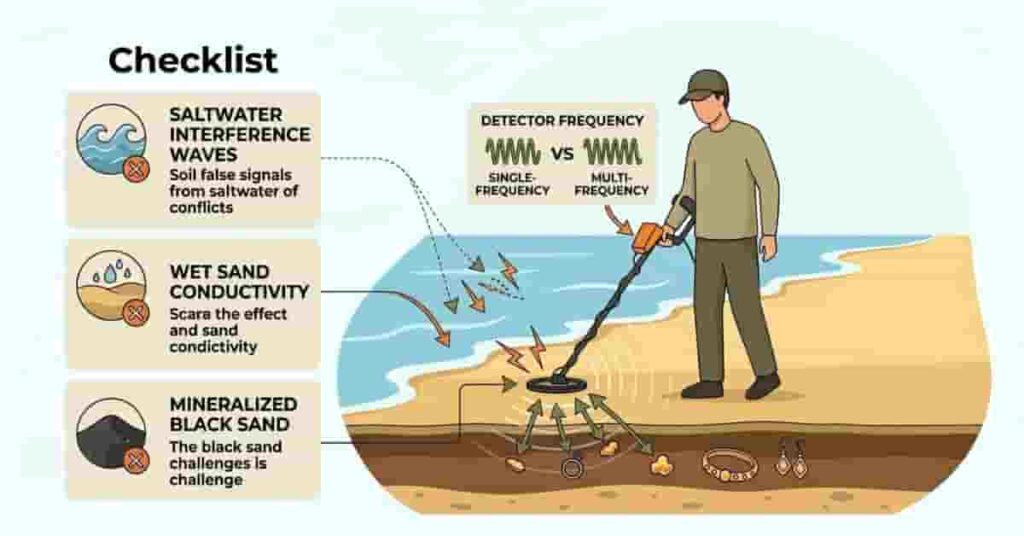
Saltwater Interference
Saltwater contains dissolved minerals that conduct electricity. This conductivity can trick a detector into reading the sand itself as a signal. Single-frequency detectors often struggle, chattering or giving false signals near the waterline.
This does not mean your detector is broken. It simply means the machine is reacting to the salt minerals in the sand.
Pro Tip:
Reduce sensitivity slightly and re-ground balance when detecting near saltwater.
Wet Sand Instability
Wet sand is another major challenge for metal detectors. When waves wash over the sand, the mineral content changes constantly. Beginners often notice unstable signals or beeping when moving from dry sand to wet sand.
Lowering the sensitivity setting and using slower sweeps (moving the search coil more slowly) helps stabilize the detector in these conditions.
Pro Tip:
Start detecting on dry sand first. Then slowly adjust settings as you move toward wet sand.
Multi-Frequency vs Single Frequency
Detector technology also affects beach performance. Multi-frequency detectors perform much better in saltwater conditions than single-frequency machines. These detectors process multiple signal frequencies simultaneously. This allows them to more accurately separate metal targets from mineralized sand.
Single-frequency detectors can work on beaches but require more careful setting adjustments.
Pro Tip:
If you hunt beaches often, consider a detector designed for saltwater environments.
Recommended Beach Settings
A few simple adjustments can significantly improve beach performance.
Try these settings when your detector becomes unstable:
- Lower sensitivity slightly
- Re-ground balance for wet sand
- Use beach mode if your detector has one.
- Sweep the coil slowly and steadily.
- Keep the coil level with the sand surface.
Takeaways
- Saltwater and wet sand confuse many detectors.
- Multi-frequency detectors handle beach conditions better.
- Small adjustments to sensitivity and ground balance often solve instability.
With the right adjustments, beach hunting becomes highly rewarding—U.S. beaches often yield valuable finds.
Brand-Specific Metal Detector Troubleshooting
Most detecting problems come from settings, batteries, or ground conditions. These issues affect almost every detector, regardless of brand. However, each brand has small differences in controls and setup. If your metal detector is not detecting targets, a quick brand-specific check may solve the problem.
Below are simple troubleshooting steps for several popular hobby detectors used by beginners in the United States.
Garrett Metal Detector Troubleshooting
Many hobbyists use Garrett detectors, but other brands exist with different features for coin, relic, and beach hunting. If a Garrett detector becomes unstable or stops detecting targets, start with a quick reset.
First, perform a factory reset if your model supports it. This clears incorrect settings that may block signals. Next, reset the ground balance. Mineralized soil can confuse the detector if the ground setting is wrong. Rebalancing often restores stable signals.
Finally, check the search coil connection. Make sure the cable is tight and wrapped properly along the shaft.
Pro Tip:
After resetting the detector, start at medium sensitivity and adjust slowly to achieve stable performance.
Bounty Hunter Metal Detector Troubleshooting
Bounty Hunter detectors are popular with beginners for their simplicity, but incorrect settings can still cause problems. Start by checking the detection mode. Some modes filter certain metals using discrimination. If the wrong mode is active, the detector may ignore valid targets.
Next, review the sensitivity level. If it is too low, the detector may miss deeper coins or jewelry. Also, inspect the battery tray. Loose batteries or poor contact can cause unstable signals or sudden power loss.
Pro Tip:
Replace batteries regularly and keep the battery compartment clean.
Whites Metal Detector Troubleshooting
White’s detectors have strong ground handling and adjustable controls, but improper tuning can reduce performance. Begin by checking the gain setting. If the gain is too high, the detector may produce noisy signals. Lowering it slightly often improves stability.
Next, review the threshold setting. This control adjusts the detector’s background hum.
A stable threshold helps the machine more clearly detect weak targets.
Pro Tip:
Set a soft, steady threshold hum. This helps you hear faint signals from deeper targets.
National Geographic & Junior Detector Troubleshooting
Beginner and junior detectors from National Geographic and similar brands emphasize simplicity. Despite few controls, even small errors—such as improper coil alignment or skipped calibration—can affect detectors designed for new hobbyists, making their troubleshooting somewhat different from that of more advanced brands.
Start with basic calibration. Turn the detector off and restart it to reset the settings.
Next, check the coil alignment. Make sure the search coil sits flat and parallel to the ground during sweeps. Finally, review the sensitivity level. Extremely high sensitivity may cause noise, while very low sensitivity can miss targets.
Pro Tip:
Use moderate sensitivity and slow sweeps when learning a beginner detector.
Takeaways
- Most detector problems stem from settings or power issues, not hardware failure.
- Each brand differs slightly in controls and adjustments.
- Resetting settings and checking the coil often quickly solves detection problems.
Quick brand checks can restore performance for your next hunt.
Certain materials produce weak signals, which is why beginners often wonder why some metals are difficult for metal detectors to detect.
How to Reset a Metal Detector (General Method)
If your metal detector is not detecting targets properly, a reset can often fix the issue. Incorrect settings sometimes cause unstable signals or missed targets. Many beginners change multiple settings while experimenting. Over time, these adjustments may confuse the detector and reduce performance.
A reset returns the detector to stable defaults and often fixes detection issues.
This method works for most beginner and hobby detectors.
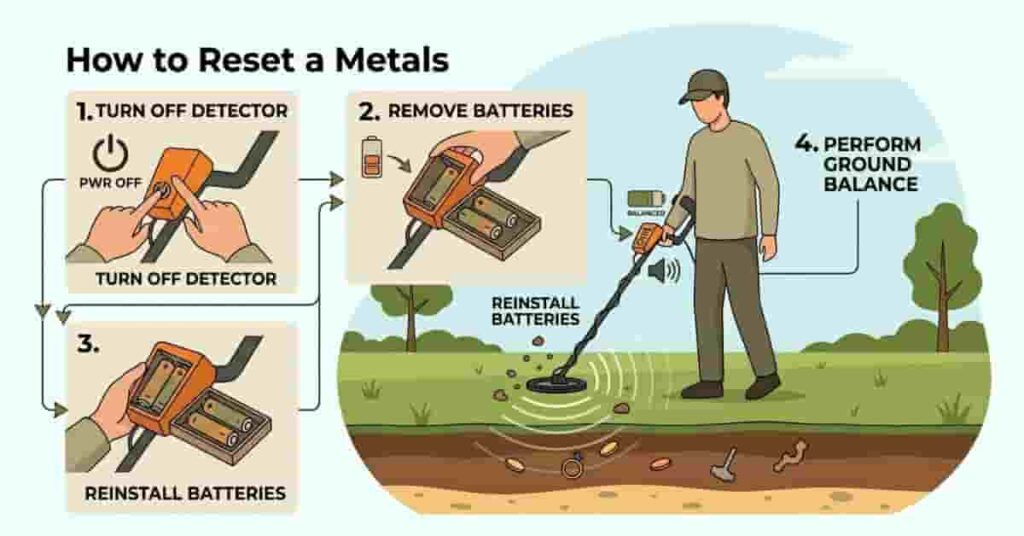
Basic Reset Steps
Follow these steps to safely reset your detector.
- Turn Off the Detector
Power off the detector completely before starting the reset. - Remove the Batteries
Carefully remove the batteries to clear all temporary power. - Wait a Few Seconds
Leave the detector without batteries for 10–15 seconds. - Reinstall the Batteries
Insert fresh or fully charged batteries securely. - Turn the Detector Back On
Power on and confirm normal display and controls. - Use Factory Reset (If Available)
Use the factory reset option in the menu if your detector offers it. - Re-Ground Balance the Detector
After resetting, complete ground balance for your soil.
Takeaways
- Resetting removes incorrect settings affecting detection.
- Brief battery removal helps reset electronics.
- Always ground balance after a reset.
A quick reset can restore normal performance and save troubleshooting time.
When Should You Repair or Replace It?
Most problems occur due to settings, batteries, or ground conditions. However, sometimes a metal detector not detecting targets may signal a deeper hardware issue. If you have already checked the coil, batteries, sensitivity, and ground balance, the detector should work normally. When problems continue after these checks, it may be time to consider repair.
Recognizing the warning signs makes it easier to determine whether a simple repair is enough or if replacement is a better choice.
Persistent Instability
Constant noise or unstable signals may mean internal failure, even after lowering sensitivity or resetting.
Furthermore, unstable performance that continues in different locations can indicate electronic problems. Loose internal wiring or damaged circuitry may be the cause. To rule out environmental interference before assuming the detector is broken, test it in another area away from power lines or mineralized soil.
Pro Tip:
If instability happens everywhere, contact the manufacturer or service center.
No Detection After All Checks
Conversely, if your detector powers on but fails to detect any metal targets, something within the system may be malfunctioning. Try basic tests first. Place a coin directly under the search coil and sweep slowly. If the detector still gives no signal, internal electronics may be damaged.
At this stage, repair may be necessary, especially if the machine previously worked well.
Pro Tip:Always test with known metal before assuming failure.
Signs of Water Damage
Water damage is another common cause of detector failure. Moisture entering the control box or coil can harm sensitive electronics.
Signs include screen glitches, random sounds, or sudden shutdowns. Many detectors aren’t fully waterproof.t.
If water exposure happens, stop using the detector until it is checked.
Pro Tip:Dry the detector fully and don’t turn it on until it’s moisture-free.
Warranty and Repair Advice
Before moving to replacement, check the manufacturer’s warranty. Many brands offer coverage for electronic faults or component failures. Remember, warranty repair often costs less than buying a new detector, and authorized service centers can diagnose issues and replace damaged parts.
If your detector is very old, or repairs are costly, replacement may be better.n.
Takeaways
- Most detecting problems come from settings, not hardware failure.
- Persistent instability or no detection may indicate internal damage.
- Water exposure can damage electronics quickly.
- Check warranty coverage before replacing your detector.
Understanding these warning signs helps you decide when professional repair or replacement is the right course of action.
Preventing Future Detection Problems
Many detection issues arise from simple maintenance mistakes. If your metal detector is not detecting targets properly, the problem often develops over time. Good care and setup prevent many problems. A few habits keep your detector stable and reliable every hunt.
Regular maintenance also protects sensitive components such as the search coil and cable. This helps extend the life of your detector and improves long-term performance.
Below are simple practices that help prevent common detection problems.
Store Your Detector Properly
Storage affects detector performance. Extreme heat, moisture, or dust can damage electronics. Always store your detector in a dry, cool place. Avoid leaving it in a hot car or damp garage.
Place the detector in a padded bag or case if possible. This prevents damage to the control box and coil.
Keep the Search Coil Clean
The search coil often comes into contact with soil and debris. Dirt buildup can affect signal stability. After each trip, wipe the coil with a soft cloth. On beaches, rinse with fresh water to remove salt.
Salt and sand slowly damage the coil housing if not cleaned.
Avoid Cable Stress
The coil cable carries signals to the control unit. Bending or pulling can damage it.
Always wrap the cable snugly around the detector shaft. Avoid tight bends near the coil connection.
During transport, keep the cable secure to avoid loose hanging or sharp twists.
Pro Tip:
Check the coil connector regularly and tighten it if it becomes loose. Perform Regular Ground Balancing. Ground conditions vary from one hunting spot to another. Soil minerals, moisture, and sand affect detection.
Regular ground balancing helps ignore mineral signals, improving depth and accuracy.
Always ground balance when you move to a new site or soil type.
Takeaways
- Proper storage protects sensitive electronics.
- A clean coil improves signal stability.
- Secure cables prevent signal interruptions.
- Regular ground balancing keeps detection accurate.
These simple habits help prevent many common problems and keep your detector performing reliably on every hunt.
Conclusion
Metal detectors may fail for simple reasons. This guide details the main causes, fast fixes, and clear troubleshooting steps.
If your metal detector fails to detect targets, the issue is usually minor. Often, incorrect settings, depleted batteries, or soil conditions are to blame. True hardware malfunctions are rare.
Mastering your detector’s settings greatly improves performance. With practice, you recognize signals faster and adjust sensitivity, ground balance, and modes confidently. Familiarity also limits false alerts and sharpens troubleshooting.
If you want to understand this better, here is a complete explanation of metals that metal detectors usually miss.
Above all, stay persistent. Every detectorist experiences these challenges while learning their machine.
If this guide helped you, share it with other hobbyists or beginners. You can also explore more metal detecting guides on our site to improve your skills and find more treasure on your next hunt.
Ethan Callaway is a passionate metal detecting enthusiast based in Savannah, Georgia, USA. Currently pursuing a B.S. in Archaeology & Historical Preservation at the University of Georgia, he combines his love for treasure hunting with research-backed insights on metal detecting techniques, safety practices, and site guidance.
Through MetalDetectingUSA.com, Ethan shares practical tips, honest product reviews, and beginner-friendly advice to help both new and experienced detectorists explore metal detecting across the United States with more confidence and understanding.