
Table of Contents
Introduction
Could your next metal detecting trip uncover a real piece of gold?
Learning how to find gold with a metal detector can turn an ordinary outing into an exciting treasure hunt. For beginners in the USA, success starts with more than simply buying a detector. You need the right equipment, proper settings, smart search techniques, and a location with realistic gold potential.
Gold can hide in rocky ground, dry washes, old mining areas, and other promising locations. Knowing where and how to search can greatly improve your chances of finding a valuable target.
In this guide, you’ll learn how to use a metal detector to find gold step by step. We’ll cover detector preparation, settings, search techniques, target identification, and recovery methods.
Before learning specific techniques, it’s useful to understand [whether metal detectors can find gold] and what makes gold challenging to detect.
By the end, you’ll have a practical approach for metal detecting for gold with greater confidence and fewer beginner mistakes.
How to Find Gold With a Metal Detector
To find gold with a metal detector, choose a suitable detector, research gold-bearing areas, set the detector correctly, and search slowly. Listen for faint signals and recover targets carefully. Learning how to use a metal detector to find gold takes practice, patience, and a systematic approach.
1. Choose an Appropriate Detector
Start with a detector designed for gold prospecting. Gold nuggets can produce weaker signals than many larger metal targets. Your detector should offer suitable sensitivity and ground-balance controls.
2. Research a Promising Area
Research areas with documented gold history before you start searching. Old mining districts, dry washes, exposed bedrock, and known placer areas can offer better potential.
Always check land ownership and local detecting rules before searching. Public access and prospecting rights can vary between locations.
3. Set Sensitivity and Ground Balance
Adjust sensitivity based on soil conditions and detector stability. Higher sensitivity isn’t always better if the detector becomes noisy.
Use ground balance to reduce interference from mineralized soil. Proper settings help you hear subtle signals more clearly.
4. Search Slowly and Systematically
Walk slowly and keep the search coil close to the ground. Overlap each sweep slightly to avoid missing small targets.
Search in a consistent pattern rather than wandering randomly. This makes it easier to cover promising ground thoroughly.
5. Investigate Weak Signals
Don’t ignore faint or inconsistent signals too quickly. Small gold nuggets may produce subtle responses, especially in highly mineralized ground.
Check suspicious signals from different directions. Changes in the response can help you decide whether further investigation makes sense.
6. Recover Targets Carefully
Use a careful digging method to avoid damaging small nuggets. Remove soil gradually and recheck the hole after each step.
Keep your recovery area neat and refill every hole. Responsible detecting protects the land and helps maintain access for future searches.
Pro Tip: Experienced gold prospectors often prioritize careful coil control and consistent ground coverage over simply increasing sensitivity.
Step 1 — Choose the Right Metal Detector for Gold
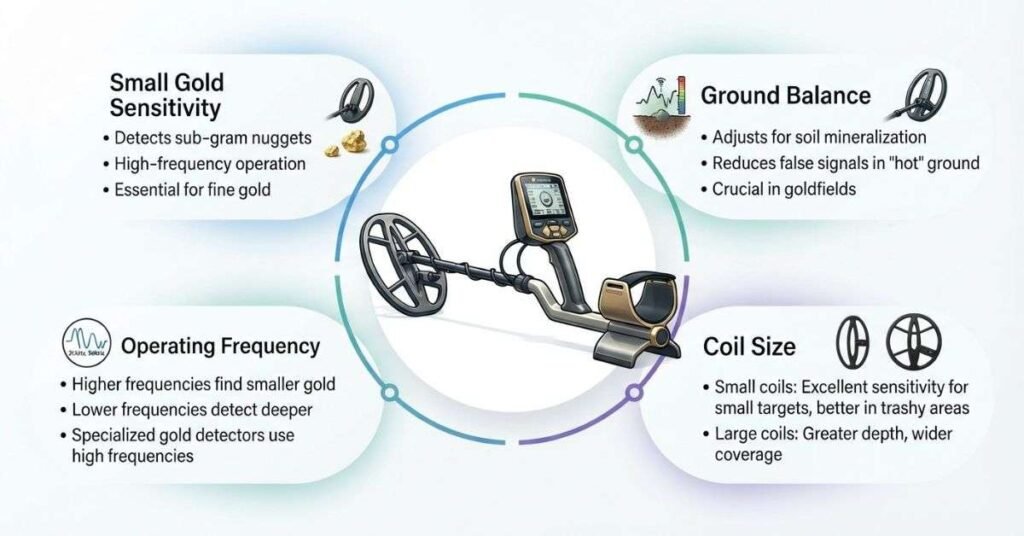
Choosing the right detector is one of the most important steps in learning how to find gold with a metal detector. Gold prospecting requires different features than general coin or relic detecting.
Focus on the detector’s ability to respond to small targets, handle mineralized soil, and maintain stable operation. A detector that works well in mild soil may struggle in areas with heavy mineralization.
You don’t need the most expensive detector to start learning. However, choosing equipment designed for gold prospecting can make small targets easier to detect.
Look for Gold-Sensitive Detection
Small gold nuggets can produce weak signals, especially when buried in difficult soil. A gold-sensitive detector can respond better to these small targets.
Sensitivity controls also let you adjust the detector’s response to faint signals. Higher sensitivity can help detect smaller targets, but it can also increase ground noise.
The goal is stable sensitivity, not simply the highest possible setting. Your detector should remain quiet enough for you to recognize genuine target responses.
Consider Operating Frequency
Operating frequency affects how a detector responds to different types of targets. In simple terms, higher frequencies often provide better sensitivity to very small, low-conductive targets.
Lower frequencies can offer advantages with larger or more conductive targets. They may also behave differently in various ground conditions.
For beginners, don’t focus on frequency alone. Consider frequency alongside ground balance, sensitivity, coil size, and soil conditions.
VLF vs. Pulse Induction
VLF and Pulse Induction detectors use different technologies. Each can work well for gold, but their strengths differ.
| Feature | VLF | Pulse Induction |
|---|---|---|
| Small gold sensitivity | Often strong for small gold, especially at suitable frequencies. | Can detect gold well, but performance depends on the detector and target. |
| Mineralized ground | Can struggle more with highly mineralized soil. | Generally handles heavily mineralized ground better. |
| Target identification | Usually provides more useful target information. | Often provides less detailed target identification. |
| Beginner considerations | Can be easier to learn and interpret. | Useful for challenging ground but may require more practice. |
The best choice depends on your location, soil conditions, target size, and experience.
For a deeper explanation of VLF and Pulse Induction technology, see Article #1.
Coil Size Matters
The search coil affects both detection behavior and ground coverage. Smaller coils can offer better control around rocks, vegetation, and tight spaces.
They can also make it easier to work through highly mineralized ground. However, smaller coils cover less ground with every sweep.
Larger coils cover more ground and can provide greater detection depth for suitable targets. They may become harder to control in difficult soil or cluttered areas.
Think of the trade-off like this:
- Smaller coil: Better target separation and control.
- Larger coil: More ground coverage and potential depth.
- Gold prospecting: Coil choice should match the target size and ground conditions.
Don’t Choose a Detector Based Only on Maximum Depth
Advertised detection depth doesn’t provide a universal measure of gold-finding performance. Actual depth depends on target size, gold composition, soil mineralization, coil design, and detector settings.
A detector’s maximum depth on a large metal object doesn’t mean it will find tiny gold at that depth. Small nuggets can produce much weaker signals.
When comparing detectors, prioritize small-gold sensitivity, ground handling, stability, and practical usability. These features matter more than one advertised depth number.
Step 2 — Research a Promising Gold Location
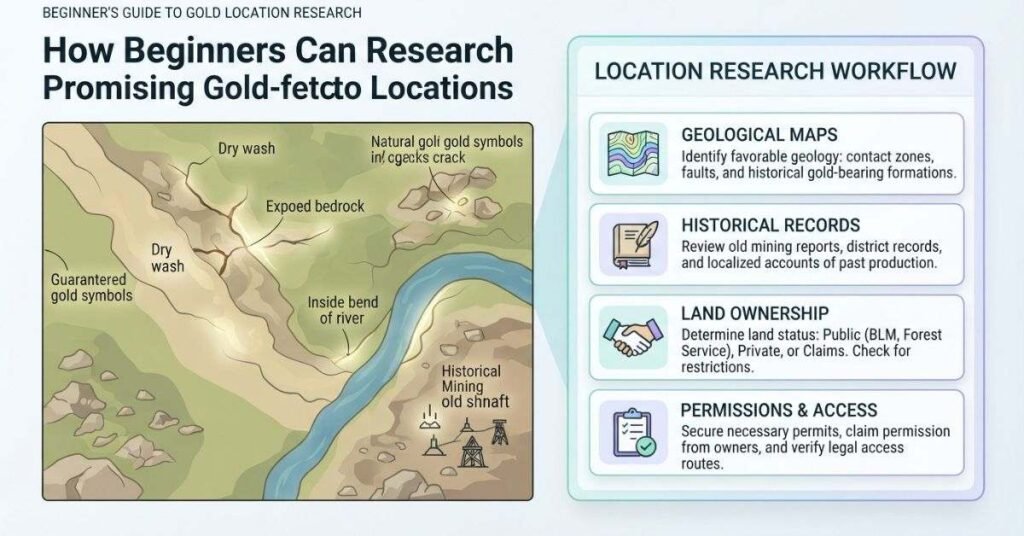
Before learning how to use a metal detector to find gold, you need to know where searching makes sense. A good detector can’t compensate for an area with little realistic gold potential.
Start by researching locations with documented gold activity. Historical records and geological information can help you narrow your search before you spend hours detecting.
Your choice of location matters just as much as your technique, so check our guide to [the best places to find gold with a metal detector].
Look for Historical Gold Activity
Historical gold activity can provide useful clues about an area’s potential. Research old mining districts, placer workings, prospecting areas, and documented gold discoveries.
Old records can also reveal where miners previously worked. These areas may help you understand how gold moved through the local landscape.
Don’t assume every old mining area still contains accessible gold. Use historical information as a starting point, then evaluate the ground yourself.
Study Geological and Historical Maps
Geological maps can show rock types, faults, mineralized zones, and other features associated with gold-bearing areas. Historical maps can reveal old workings, trails, streams, and mining sites.
Compare multiple sources rather than relying on one map. Look for locations where historical activity and favorable geology overlap.
This approach can save time and help you search more deliberately.
Identify Natural Gold Traps
Gold is heavy, so moving water can concentrate it in natural traps. Understanding these features can help you decide where to sweep your detector.
Pay particular attention to:
- Bedrock cracks: Gold can settle into cracks and natural crevices.
- Inside bends: Slower water can deposit heavier materials along inside bends.
- Natural depressions: Low spots can collect dense material carried by water.
- Heavy mineral deposits: Dark, dense mineral concentrations can indicate areas where heavy materials settled.
These features don’t guarantee gold. They simply provide useful clues when evaluating a promising area.
Check Whether Detecting Is Allowed
Always confirm that metal detecting and gold prospecting are allowed before you begin. Land ownership, access rights, protected areas, and local regulations can affect where you may legally search.
Rules can differ between public and private land. Some locations may also restrict digging or collecting natural materials.
Step 3 — Set Up Your Metal Detector
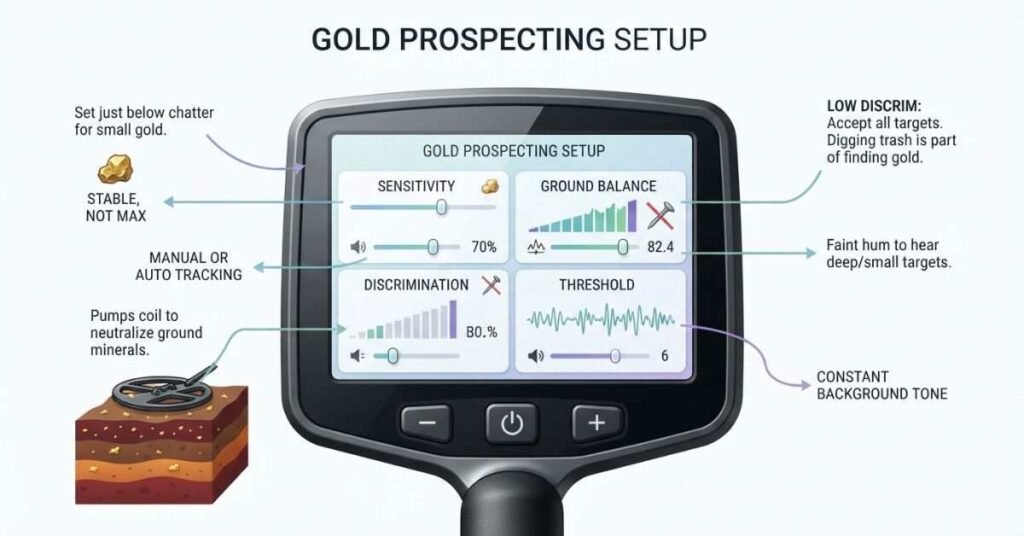
Proper setup can make a major difference when learning how to find gold with a metal detector. Gold prospecting often involves tiny targets and mineralized soil, which can make detection challenging.
Before searching, adjust your detector for the ground conditions. Avoid simply using the highest sensitivity or changing several settings at once. Make small adjustments and listen for how the detector responds.
Adjust Sensitivity
Start with a sensitivity level that produces a stable detector response. Then increase it gradually while monitoring the audio and target response.
Higher sensitivity can improve your chances of detecting small gold. However, excessive sensitivity can create instability, ground noise, and false signals.
If the detector becomes difficult to operate, reduce sensitivity slightly. A stable detector is usually more useful than one running at an extreme setting.
Ground Balance the Detector
Ground balance helps the detector compensate for naturally occurring minerals in the soil. This matters because mineralized ground can produce strong responses that interfere with target detection.
Gold-bearing areas often contain mineralized soil. Without proper ground balance, the detector may become noisy or produce inconsistent responses.
Follow your detector’s ground-balance procedure and adjust it when soil conditions change. Proper balancing can improve stability and make genuine target signals easier to recognize.
Reduce Discrimination
Discrimination filters certain types of metal responses. While this can help reject unwanted targets, excessive discrimination can work against gold prospecting.
Small gold targets may produce unusual or weak responses. High discrimination settings can cause some of these signals to be reduced or rejected.
For gold hunting, use as little discrimination as practical. This keeps more potential targets available for investigation.
Set the Threshold
The threshold is a continuous background audio response on suitable detectors. It gives you a reference point for hearing subtle changes in the detector’s response.
A stable threshold can make small variations easier to notice. However, an overly loud or unstable threshold can make faint signals harder to interpret.
Set it at a comfortable level that remains steady during normal searching. Detector design and recommended settings vary, so follow the manufacturer’s guidance.
Test Your Detector Before Searching
Test your detector before covering serious ground. Use known targets that represent the type of gold or metal targets you’re looking for.
Try testing in conditions similar to your search area. Soil mineralization can change detector behavior, so testing only indoors may give misleading results.
Listen to how different targets respond from several directions. This quick practice session can help you recognize subtle signals once you begin searching.
Step 4 — Learn the Correct Search Technique
Once your detector is properly configured, your search technique becomes the next priority. Even a capable detector can miss small gold if you swing it too quickly or inconsistently.
If you’re wondering how deep you should search, our guide to [how deep a metal detector can detect gold] explains the main factors that affect detection depth.
The goal is to cover the ground carefully while keeping the coil at a consistent height. Slow, controlled movements also make faint responses easier to notice.
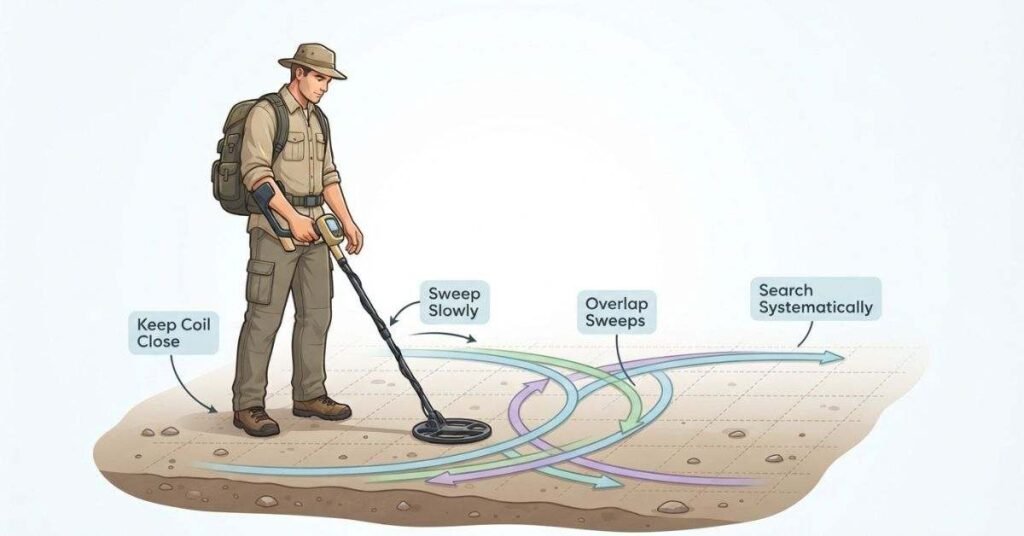
Keep the Coil Close to the Ground
Keep the search coil close to the ground without repeatedly striking rocks or vegetation. Consistent coil height helps maintain a more predictable detection response.
Lifting the coil during each swing can reduce sensitivity to shallow or small targets. Try to keep your sweep level throughout each pass.
Pay extra attention when crossing uneven ground. Adjust your movement rather than making large changes in coil height.
Sweep Slowly and Smoothly
Small gold can produce subtle responses, so avoid rushing your sweeps. Move the coil at a controlled pace that lets the detector process each part of the ground.
Use smooth side-to-side movements instead of sharp or jerky swings. Slow searching also gives you more time to investigate unusual audio responses.
If the ground becomes difficult, slow down even further. Careful coverage matters more than covering a large area quickly.
Overlap Each Sweep
Overlap each coil pass slightly to reduce gaps between sweeps. This is especially important when searching for tiny targets.
Think of each sweep as one narrow path across the ground. The next path should partially cover the previous one.
Search in a Systematic Pattern
Use a repeatable search pattern instead of walking randomly. Parallel lines work well for covering open areas, while a grid can provide even more organized coverage.
You can also follow natural features when investigating likely gold traps. Search around exposed bedrock, depressions, and other areas where heavy material may collect.
Useful approaches include:
- Parallel lines: Walk straight passes across the search area.
- Grid pattern: Search the same area in two directions.
- Natural features: Follow promising geological features carefully.
Listen for Weak or Repeatable Signals
Tiny gold can produce subtle signals depending on its size, shape, orientation, depth, detector, and soil conditions.
Don’t expect every gold target to produce a loud or obvious response. A weak signal that repeats deserves closer attention.
With practice, you’ll become better at recognizing unusual responses. Always consider the ground conditions before deciding that a faint signal is simply noise.
Step 5 — Investigate Every Promising Signal
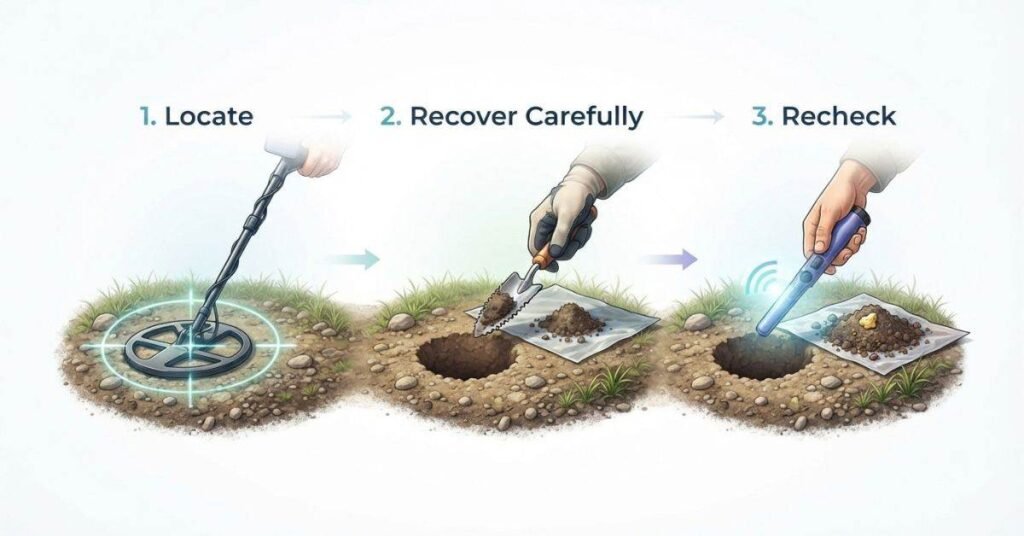
Finding a suspicious signal is only the beginning. You need to investigate it carefully before deciding whether it represents a worthwhile target.
Small gold can create responses that differ from larger metal objects. Difficult soil can also make signals sound inconsistent or change their apparent characteristics.
Check the Signal From Multiple Directions
Sweep across the target from different angles. A genuine target may produce a noticeable response when the coil crosses it from several directions.
Changing your sweep direction can also help separate a target response from ground noise. Don’t make a digging decision from one quick pass.
Re-Sweep After Changing Your Position
Move a short distance and approach the target again. Changing your position can alter the detector’s response, especially in uneven or mineralized ground.
Try approaching from the opposite direction. Compare the new response with what you heard initially.
Watch for Changes in Signal Strength
Pay attention to whether the signal becomes stronger or weaker as you move the coil. Narrow, repeatable responses can deserve further investigation.
You can also slowly reduce the area you’re sweeping. This helps you locate the target’s approximate center before digging.
Don’t Rely Only on the Target ID
Target identification can provide useful information, but it isn’t perfect. Tiny, irregular, deep, or poorly oriented targets can produce unexpected readings.
Mineralized soil can also affect target responses and identification. A potentially valuable target may not display the number you expect.
Use target ID as one clue rather than a final decision. Audio response, repeatability, soil conditions, and target behavior should also influence your decision.
Step 6 — Recover the Target Carefully
Once you’ve decided to investigate a target, recover it carefully. Small gold can be surprisingly easy to lose during digging, especially when mixed with loose soil.
A controlled recovery process helps you locate the target while disturbing as little ground as possible.
Locate the Target Precisely
Narrow down the target location before digging. Sweep from several directions and identify the strongest response area.
Accurate pinpointing means you can make a smaller recovery hole. This saves time and reduces unnecessary disturbance.
Dig a Small Recovery Hole
Start with a small hole around the target area. Remove soil gradually instead of immediately digging a large section.
Keep the removed material together in one place. This makes it easier to recheck the soil if the target isn’t immediately visible.
Recheck the Hole and Removed Soil
After removing some soil, sweep the hole again. Then check the soil you removed.
If the signal moves, follow it carefully. The target may have shifted within the loose soil during recovery.
Use a Pinpointer When Appropriate
A pinpointer can help locate a shallow target inside loose soil or a recovery hole. It can reduce digging time and help prevent unnecessary disturbance.
For tiny targets, use the pinpointer carefully and recheck the surrounding soil if the signal disappears.
Handle Tiny Targets Carefully
Small gold can be difficult to see among dirt, gravel, and other debris. Avoid quickly dumping recovered soil or brushing it away.
Place removed material on a clean surface and check it methodically. Recheck the hole, your tools, and the surrounding soil before leaving.
Pro Tip: When recovering a suspected tiny target, keep every piece of removed material until you’ve confirmed where the signal went.
How to Find Gold Nuggets With a Metal Detector
Finding natural gold nuggets requires patience, careful detector control, and good ground selection. Nuggets can be tiny and may produce weak signals, especially in mineralized soil.
The goal isn’t to dig every inch of ground randomly. Instead, focus on promising features and use a slow, repeatable search technique.
Search Slowly for Small Nuggets
Small nuggets can produce subtle responses that are easy to miss. Move the coil slowly and keep it close to the ground.
Avoid rushing across large areas. A slower sweep gives your detector more time to respond to small targets.
Overlap each sweep to reduce gaps. This becomes especially important when searching rocky or uneven ground.
Pay Attention to Weak Signals
Don’t ignore a faint response simply because it isn’t loud. Small gold may produce a soft or unusual signal.
Sweep across the target from different directions. A repeatable response deserves closer investigation, even when the signal seems weak.
Your experience will improve as you learn how your detector responds to small targets.
Adjust for Mineralized Ground
Mineralized soil can create noise and unstable detector responses. This can make small gold harder to recognize.
Use the detector’s ground-balance controls according to the manufacturer’s instructions. Adjust sensitivity when necessary to maintain a stable response.
Don’t assume maximum sensitivity always produces the best results. A stable detector can make subtle target changes easier to hear.
Investigate Small Targets Carefully
When you find a suspicious signal, pinpoint it before digging. Remove soil gradually and check the hole after each step.
Also recheck the removed soil. Tiny nuggets can remain hidden in loose dirt or gravel after the first recovery attempt.
Keep your recovery area organized. This reduces the chance of accidentally losing a small target.
Search Around Natural Gold Traps
Natural features can help you decide where to concentrate your search. Look for places where moving water could have slowed down and deposited heavy material.
Useful features include:
- Bedrock cracks and crevices
- Inside bends of old waterways
- Natural depressions
- Areas containing concentrated heavy minerals
These features don’t guarantee gold. Use them as practical clues while applying the detector techniques discussed above.
How to Find Gold Rings and Jewelry With a Metal Detector
Finding manufactured gold jewelry uses many of the same basic detecting skills. However, jewelry hunting often takes place in different environments than natural-gold prospecting.
Gold rings, chains, and pendants can appear around beaches, parks, swimming areas, and other places where people gather. Target size and shape can also affect the detector’s response.
Gold Rings
Gold rings are generally easier to detect than extremely thin jewelry. Their size, shape, purity, orientation, and depth can affect the signal.
When searching for rings, avoid excessive discrimination. Some gold rings can produce responses similar to unwanted metal targets.
Gold Chains
Thin gold chains can be challenging because individual links contain very little metal. Their orientation can also affect the detector response.
A chain lying differently on the ground may produce a weaker or less consistent signal. Use careful sweeps and investigate questionable responses.
Gold Pendants and Other Jewelry
Pendants and other gold jewelry vary greatly in size and shape. Larger pieces may produce stronger responses than tiny items.
Don’t rely on one target ID number. Consider the audio response and surrounding conditions before deciding whether to dig.
Why Thin Gold Chains Can Be Difficult
Thin chains contain less metal than many rings or pendants. Their linked construction can also create unusual detector responses.
Jewelry hunting may require different settings and search techniques than natural-gold prospecting. Beach sand, dry soil, parks, and highly mineralized goldfields can behave very differently.
Common Mistakes That Prevent Beginners From Finding Gold
Many beginners struggle because of their search approach rather than their equipment. Small changes in technique can make searching more productive and easier to manage.
Searching Random Locations
Random searching wastes time when an area has little gold potential. Start with historical and geological research before detecting.
Better approach: Identify areas with documented gold activity and promising natural features.
Moving the Coil Too Quickly
Fast swings can cause you to miss subtle responses from small targets.
Better approach: Slow your sweep and maintain consistent coil movement.
Using Too Much Discrimination
High discrimination can reject targets that produce unusual gold responses.
Better approach: Keep discrimination low when prospecting and investigate questionable signals.
Running Excessive Sensitivity
Maximum sensitivity can increase false signals and ground noise.
Better approach: Increase sensitivity gradually until the detector becomes unstable, then reduce it slightly.
Ignoring Ground Mineralization
Mineralized soil can interfere with target detection and create unstable responses.
Better approach: Ground balance regularly and adjust settings as soil conditions change.
Skipping Historical Research
A good detector won’t create gold where none exists.
Better approach: Research historical mining activity, geology, and known gold-producing areas first.
Giving Up After a Short Search
Gold detecting doesn’t guarantee a target every time you search. Empty outings can happen even in areas with genuine potential.
Better approach: Treat each search as practice. Learn the detector, study the ground, and improve your target recognition over time.
How Long Does It Take to Find Gold With a Metal Detector?
There is no guaranteed timeframe for finding gold with a metal detector. One search may produce a target, while another may produce nothing.
Location quality often matters more than simply spending additional hours detecting. An area with little realistic gold potential can remain unproductive regardless of how long you search.
Experience also changes what you notice. As you practice, you’ll become better at recognizing subtle signals and understanding how your detector behaves in different ground conditions.
Research can therefore be just as important as search time. Studying historical activity, geology, and natural gold traps helps you spend your detecting time more effectively.
For beginners, focus on building good habits rather than expecting a guaranteed discovery. Search carefully, learn from empty areas, and record what you find. Over time, better research and improved detector skills can make your searches more efficient.
How to Improve Your Gold-Detecting Skills
Good gold detecting involves more than owning a capable detector. Your skills improve when you learn how your equipment responds and understand the ground you’re searching.
Practice With Known Targets
Practice with known metal targets before searching for natural gold. Test targets at different depths and orientations to learn how your detector responds.
Pay attention to changes in audio, target response, and detector stability. Regular practice makes unfamiliar signals easier to recognize during real searches.
Learn Your Detector’s Audio Responses
Spend time learning the detector’s audio language. Different targets and ground conditions can produce different sounds and response patterns.
Don’t depend entirely on target ID numbers. Audio responses can provide useful information, especially when searching for small or irregular targets.
Keep Notes About Productive Areas
Record useful observations after each detecting session. Note the type of ground, geological features, detector settings, and targets you encountered.
These notes can reveal patterns over time. You may also identify specific areas that deserve another careful search.
Revisit Productive Ground
Finding one promising target can make nearby ground worth investigating again. Search around the original area using a slightly different pattern.
You may also detect ground you previously missed. Changing your direction, coil position, or settings can reveal targets that weren’t obvious earlier.
Study Local Geology and Mining History
Understanding local geology helps you recognize areas with realistic gold potential. Historical mining records can also show where previous prospectors worked.
Combine geological information with what you observe in the field. Look for connections between natural gold traps, historical workings, and your detector results.
Learn From Experienced Prospectors
Experienced prospectors can teach practical skills that take longer to develop alone. Watch how they control the coil, evaluate signals, and read the ground.
Expert Tip: Don’t copy another prospector’s detector settings blindly. Use their advice as a starting point, then adjust for your detector and ground conditions.
Is It Legal to Find Gold With a Metal Detector?
The legality of gold detecting depends on where you search and who controls the land. Public land doesn’t automatically mean metal detecting or gold collection is allowed.
Before detecting, check:
- Land ownership: Determine whether the property is public, private, or managed by another entity.
- Federal land rules: Different federal lands can have different detecting and collecting restrictions.
- State rules: State laws may regulate prospecting, digging, collecting, or access.
- Local regulations: County and local rules may impose additional restrictions.
- Private-property permission: Get the landowner’s permission before searching private property.
- Protected areas: Parks, historic sites, archaeological areas, and other protected locations may have strict restrictions.
Always verify the current rules for the specific location before starting your search. For detailed U.S. location guidance and legal considerations, see Where to Find Gold With a Metal Detector.
conclusion
Finding gold takes the right detector, careful settings, smart research, and a patient search technique. You now know how to find gold with a metal detector, from choosing equipment to recovering promising targets.
Remember that results depend heavily on location, ground conditions, and your experience. Small gold can produce weak signals, so practice and careful listening matter.
Start by researching realistic gold-bearing areas, then adjust your detector for stable performance. Search slowly, investigate questionable signals, and recover targets responsibly.
Ready to put these techniques into practice? Explore more gold prospecting guides on our website, and share your detecting experiences or discoveries in the comments.
Frequently Asked Questions

Ethan Callaway is a passionate metal detecting enthusiast based in Savannah, Georgia, USA. Currently pursuing a B.S. in Archaeology & Historical Preservation at the University of Georgia, he combines his love for treasure hunting with research-backed insights on metal detecting techniques, safety practices, and site guidance.
Through MetalDetectingUSA.com, Ethan shares practical tips, honest product reviews, and beginner-friendly advice to help both new and experienced detectorists explore metal detecting across the United States with more confidence and understanding.